Tactics for growing plants
Unlike Temperate regions, where you grow seedlings in the cold Spring ready for the warmer Summer, here you grow seedlings in the still hot Autumn ready for the colder Winter. This means the seedlings are under great stress, especially from dehydration. You buy seedlings from a nursery, plant them out and 2 hours later, they are dead, as the dry soil sucks out all their water.
The solution is:
- Mix in a great deal of peat: at least 1 part peat to 3 parts soil, but 50% peat if you are using “new soil”. By the end of the summer, the peat will have turned to dust and in the next Autumn, you need to start again with more peat.
- Make sure the plants have an extensive root system before planting them out. This requires repotting in to bigger pots.
Thus, you are working in stages:
|
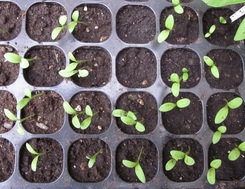
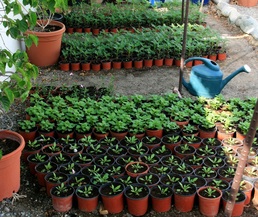
1. You buy seedlings from a nursery in a plastic tray, or alternatively, you plant your own seeds in a plastic tray. Ideally, you should use potting compost, otherwise what you are carefully nursing may be a weed and not what you planted. You should keep them in the shade and carefully water daily (making sure the force of the water does not knock over the seedling!). Plant 2 seeds in each trough. When they sprout (as in photo), you can transplant to fill failed troughs (as in top of photo). At this stage, they have only a small thick root and so are not easily damaged by transplanting. Extra seedling can be thrown away to leave 1 seedling/ trough
Bought seedlings are probably big enough for stage 2. |
|
2. Transplant each seedling in to a small pot. Use a soil/ peat mixture and ¾ fill the pot. Compress the soil then water (if you do not do this, the soil can remain dry for days as the water cannot easily penetrate dry soil and your seedling may die). Then put in the seedling and top up with soil. Compress the soil firmly and water again. Keep the young plants in the shade and water daily.
|
|
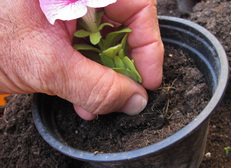
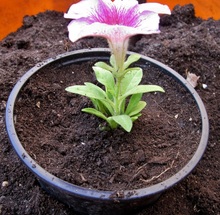
3. Transplanting procedure. When transplanting your seedling, make sure the leaves do not touch the soil or they will rot. This is particularly a problem for plants with a short stem like petunias. Hold the seedling so that the leaves are squeezed into a vertical cylinder (see photo). Then press the soil up against the seedling to maintain the cylindrical shape, and so preventing the leaves flopping down on to the soil. If necessary, put small flat pebbles under the bottom leaves to keep them off the soil. This is particularly important for petunias, which are very prone to leaf rot. When watering, check that the plant is not knocked over by the force of the water and sticks to the soil. |
|
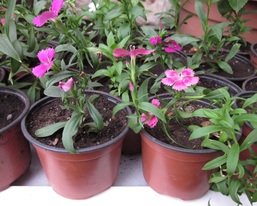
4. Nursery for seedlings. If you are growing on a large scale - I have done 300 pots at a time, the limit being the number of pots you have available - then you need to set aside a shaded nursery area. It is a good idea to label your plants. You might for example be growing 3 colours of petunias and soon not be able to remember which is which. After 3 weeks, your plants are ready to face the world. By now, they should have roots coming out the bottom of the pot and should have branched out to fill the pot. They may even be flowering, but I would discourage this, especially in petunias, by pinching off the flower buds, to encourage them to branch and not flower at this stage.
|
|
5. If you are planting them in to a pot, water the pot extensively (maybe 3 times over the next 30 minutes) and keep in the shade for a couple of days to stabilise.
If you are planting them into beds in the sun, you need to be careful. The 1st step is to prepare the bed beforehand. You need to dig in a great deal of peat. Peat both conserves water (acts like a sponge) and improves aeration of the soil (roots will die if they do not get oxygen). 1 large peat bag will be needed for about 12 square m. Afterwards, it is very difficult to get water to penetrate dry soil. My strategy is to dig holes for each plant and then fill the holes with water. When the water has disappeared, put in the plants, but every half hour of planting, you need to stop and water all your plants. You need to extensively water many times on that first day and if possible, water morning and night for the next few days. Even after extensive watering, you may find that if you dig the soil, only the top 3 cm is damp - but the plant roots are deeper than this. Note: More information about planting is given under the section of Herbaceous flowers. |
